These are the types of action that Alt Controller can currently perform.
| Type of action | Description |
| Type key | Types (i.e. presses and releases) a single key or key combination |
| Type text | Types a text string (any number of characters), which can include special characters |
| Hold key | Holds down a key (if it isn’t currently held down) and optionally releases the key after a number of seconds |
| Release key | Releases a key (if it is currently held down) and stops any Repeat Key actions in progress for the key |
| Repeat key | Presses a key repeatedly |
| Repeat key (directional) | Presses a key repeatedly while the mouse pointer is inside a particular screen region |
| Toggle key | Holds down a key if it isn’t currently pressed, or releases it if it is currently pressed |
| Mouse hold | Presses and holds down a mouse button |
| Mouse click | Clicks (i.e. presses and releases) a mouse button |
| Mouse double-click | Double-clicks a mouse button (i.e. clicks twice) |
| Mouse release | Releases a mouse button if it is currently held down |
| Toggle mouse button | Presses a mouse button if it isn’t currently pressed, or releases it if it is currently pressed |
| Change mode | Changes to a different Alt Controller mode |
| Change page | Changes to a different Alt Controller page |
| Scroll up | Scrolls the mouse wheel one click up |
| Scroll down | Scrolls the mouse wheel one click down |
| Repeat scroll up | Repeatedly scrolls the mouse wheel up |
| Repeat scroll down | Repeatedly scrolls the mouse wheel down |
| Stop scrolling | Stops scrolling the mouse wheel |
| Move the pointer | Moves the mouse pointer to a new location |
| Load profile | Loads a different profile |
| Start program | Runs a system command to start a program, open a folder, etc. |
| Activate window | Switches to another window |
| Maximise / minimise window | Maximises / restores / minimises the current (i.e. active) window, where possible |
| Show / hide custom window | Shows (i.e. opens or unminimises) or minimises a custom window, or toggles between the two |
| Toggle menu option | Turns the specified main menu option on / off |
| Wait | Waits for a specified time before performing the next action |
| Stop ongoing actions | Releases any key or mouse button that Alt Controller has pressed, and stops any actions in progress |
Here are some notes to help explain certain types of action.
Type text action
This types a string of text (one or more characters) as if you’d typed it on the keyboard. You can include special characters such as accented letters and symbols. To create this type of action, you can cut and paste text from another program into the Edit action window.
Hold key action
This presses down a key as if you were holding it down on the keyboard. Don’t worry if the key might already be held down for any reason, that’s not a problem. You can choose for the key to be released automatically after a number of seconds, or release it manually using a Release key action at a time of your choosing.
Release key action
This releases a key that is currently held down. Don’t worry if the key might already have been released by another means, this isn’t a problem. This action also stops any Repeat key actions that are in progress for that key.
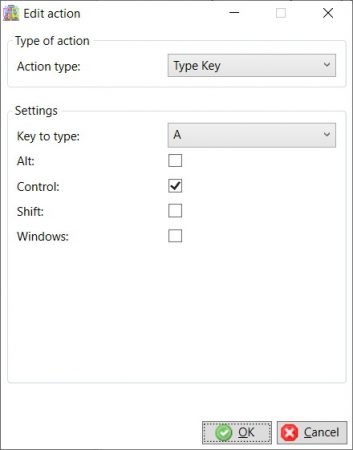
Repeat key action
Presses and releases a key repeatedly. You can specify how often to press the key, how long to hold each press for and, optionally, a time to stop after. The times are entered in seconds. If you want the key presses to continue indefinitely until you use a Release key action or the action is deactivated, set the Stop after value to zero. The example below presses the A key for 50 milliseconds, once every second.

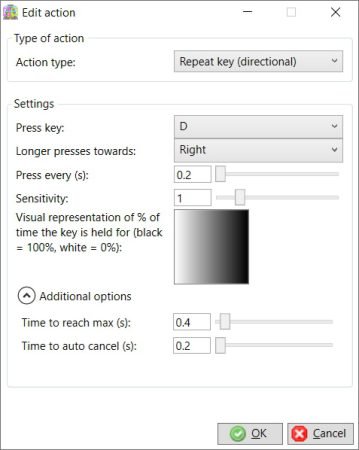
Repeat key (directional) action
This action repeatedly presses and releases a key while the mouse is inside a screen region. It’s primarily intended for steering and accelerating in racing games. You can specify how often you want the key to be pressed and also a side of the screen region where the key should be pressed for longer (if required). The sensitivity setting controls how quickly the key press time increases as the pointer moves towards the specified side of the region.
Early versions of the software had two additional and rather experimental options intended to imitate the gradual way in which a driver steers a car and, by request, these options have been reintroduced in version 1.96. The idea is that ‘Time to reach max’ represents the time it takes to turn the steering wheel to the desired position (i.e. ramp up time) and ‘time to auto cancel’ represents the time it takes for the steering wheel to return to the centre position (i.e. ramp down time). Eye tracker users in particular may wish to play around with these values to fine tune their controls. Setting the values to zero effectively means they are not used, which is the default behaviour.
Toggle key action
This presses a key if it is not currently pressed, or releases it if it is pressed, i.e. it toggles the key state.
Mouse button actions
These allow you to automatically press, release, click (i.e. press and release) or double-click (i.e. click twice) any of the mouse buttons.
Toggle mouse button action
This presses a mouse button down if it is not currently pressed, or releases it if it is pressed, i.e. it toggles the mouse button state.
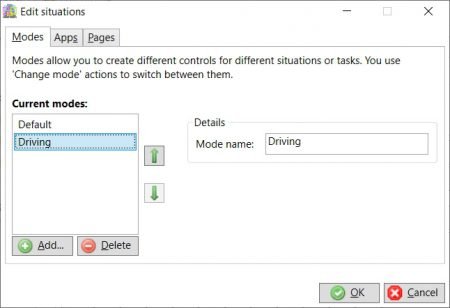
Change Mode action
Use this to change to a different mode that you have created using the Edit situations window. Modes allow you to have different sets of actions active according to the activity you’re doing.
The Change Mode action settings let you select a particular mode by name. However, you can also select Last used in order to toggle back and forth between two modes (useful for turning actions on and off with a single input). Alternatively, you can use Next and Previous to cycle through a number of modes in sequence.
You can assign actions to the Default mode if you want them to apply all of the time. This means you can use modes to vary only some of the controls and not others.

Change Page action
Pages work in the same way as modes. You can think of them as “sub-modes”. They might be useful in situations where you want a small variation in the current set of actions. This type of action changes the page of controls that is currently active.
Scroll wheel actions
These actions emulate scrolling up and down using the mouse scroll wheel.
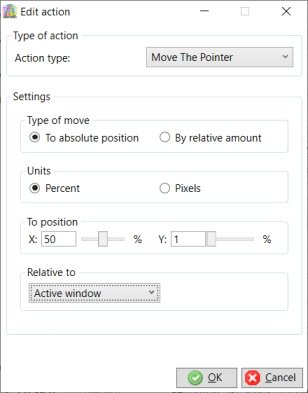
Move the pointer action
Moves the mouse pointer to a new location. Example scenario: “When I release the right shift key, move the mouse over a button and then left-click”.
You can move the mouse to an absolute position, or by a relative amount. You can also specify the position or amount either in pixels, or as a percentage of the window / screen / desktop size. This means that you can create profiles that work regardless of window size / position and screen resolution.
X runs from left to right and Y runs top to bottom, so (0%, 0%) is the top-left corner and (100%, 100%) is the bottom-right. The example below moves the pointer approximately to the middle of the current window’s title bar.
Load profile action
Loads the specified profile. If either the Edit profile or Edit screen regions windows is open, or the current profile has unsaved changes, an warning will be displayed in the main Alt Controller window and the action will not be performed. This is to avoid you potentially losing unsaved changes you have made to the current profile.
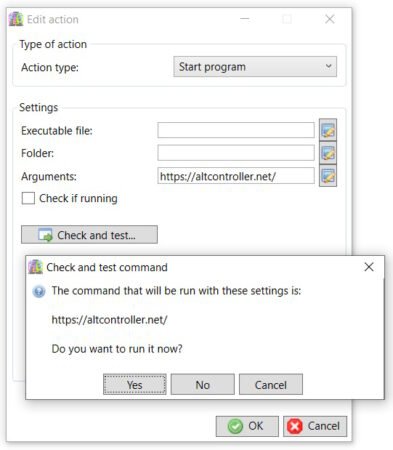
Start program action
Runs a system command, which can be used to start a program, open a folder, run a desktop shortcut, open a web page, etc. First, choose the program or file you want to execute by clicking the button next to the Executable file input box, browsing to the program or file, and clicking Open. This will populate the Executable file box with the filename (e.g. ‘notepad.exe’ or ‘My shortcut.lnk’) and the Folder box with the folder it is located in.
Note: If you manually type the filename of the executable in the box, remember to include its file extension (e.g. ‘.exe’). If the location of the executable is in your system path (i.e. the list of folders Windows looks for programs in automatically), you don’t need to specify the folder.
Optionally, you can enter additional program arguments in the Arguments box, which could be a program option (e.g. ‘–silent’, ‘/help’) or a file you want to edit (e.g. “C:\Some Folder\My Document.docx”) with the specified program, for example.
Note: To create an action that opens a file or web page with the default program associated with its file type, you can specify it in the Arguments box and leave the Executable file and Folder boxes blank (see screenshot below for an example).
If the Check if running option is ticked, Alt Controller will try to check whether the program is already running, and if so, it will not run the command.
Optionally, the Check and test button can be used to test that your settings work before saving the Start program action. When you click it, Alt Controller will show you the command that will be run and will ask you to confirm that you want to run it. When you choose Yes, it will run the command and confirm whether it ran successfully or an error occurred.
For your security, when a profile contains a Start program action and you trigger it to run a command for the first time, it will pop up a message box asking you to confirm that you want to run the command (see screenshot below). If you tick the Don’t show this again box, it will remember your choice and not ask you again for that command.
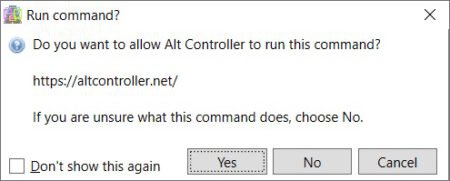
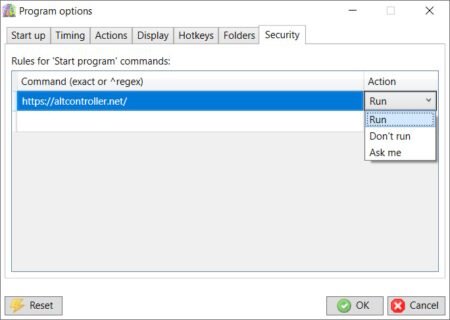
You can edit which commands are allowed or disallowed at any time using the Security tab of the Program options window.
Activate window action
Activates (i.e. switches to) the specified window. Specify the name of the program or the title of a window you want to activate, or both. (If the program or window is already open, you may be able to select it from the drop down lists.) You can use the Starts option to specify just the beginning portion of the window title, or the Ends option to specify the end of the title. If more than one window matches the criteria specified, Alt Controller will try to activate the first one it finds.
If the Restore if minimised option is selected, Alt Controller will try to restore the window (i.e. ‘unminimise’ it) if it is minimised.
If the Minimise if active option is selected, Alt Controller will try to minimise the window if it is already the active window. This allows you to toggle a window between the restored and minimised states.
Note: if you want to activate or minimise a custom window you have created in Alt Controller, it is better to use the Show / hide custom window action type; this avoids certain conflicting actions, such as trying to minimise a custom window by clicking a button in it, and allows some additional possibilities.
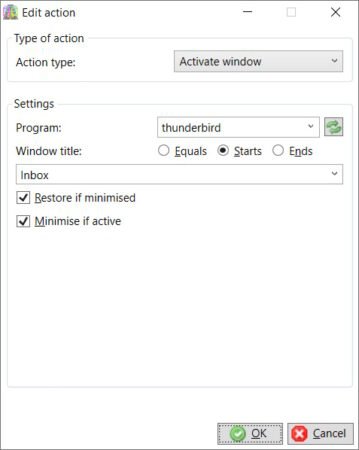
Example: the action shown in the screenshot below switches to the Inbox window of my Mozilla Thunderbird program. I specified both the program and the window title because I could have more than one window open (e.g. when composing a message to someone). I also used the Starts option because the full title of the window can change (depending on which email account I am using) but it always starts with ‘Inbox’.
Show / hide custom window
Shows (i.e. opens or restores) the specified custom window(s) (defined in your Alt Controller profile) or hides it (i.e. minimises it), or toggles between these two states. If you select ‘(All)’ in the drop down list of windows, the action will be applied to all the custom windows defined in your profile.
Toggle menu option
Turns on or off the specified option (Draw pointer indicator, Show mode/page overlay, Show title bars, etc.) in the View and Window menus of the main Alt Controller window as if you had clicked it. This was already possible by defining hotkeys in the program options, however hotkeys can cause unexpected results when more than one instance of Alt Controller is running.
Wait action
Waits for a specified time. Use this to create a series of actions with time delays between them. Ensure that your actions are set to perform in series (which is the default) when using Wait actions otherwise they will have no effect.
Stop ongoing actions
This action type is like an emergency stop. It stops any ongoing actions that are being performed by Alt Controller (e.g. repeated key or mouse button or scrolling actions) plus releases any keys or mouse buttons that have been pressed. This action type could be used before switching back to the Default mode, for example, to release any keys that have been pressed or toggled.
Advanced notes
- In many cases, Stop ongoing actions is not needed before changing mode / page because Alt Controller automatically stops any incomplete (ongoing) actions before deactivating them and ensures that keys and buttons do not remain pressed. However, Toggle key / mouse button actions and Hold key / Mouse hold actions with no release time specified are instantaneous actions that complete immediately (i.e., are not ongoing); in this case, the toggled or held key / button is not released automatically and the user is responsible for releasing it manually when required using a Release key / Mouse release action (or using Stop ongoing actions).
- From version 1.8, Alt Controller now provides an option to stop any ongoing actions assigned to the Pressed / Inside event reasons when the corresponding Released / Outside event happens for a key or button or screen region. This allows the powerful possibility to perform different numbers of actions according to the length of time a key or button is held down or a control is hovered. For example, if the following three actions are assigned to the Pressed reason for a button:
Type “Hello!”
Wait 2 seconds
Type “Goodbye.”
then, with this option enabled, if the user only holds the button down for 1 second, it will just type “Hello!”, but if the user holds the button down for 3 seconds, it will type “Hello!” followed by “Goodbye.” (2 seconds later). The same logic applies to hovering over a button or in a screen region for different amounts of time. The automatic stopping of actions on Release / Outside can be turned on or off in Tools – Options – Actions. See also Action options.